

2020-12-23 23:06:00
As I mentioned earlier this week, I've been studying for RedHat's EX407 exam. Looking back at my CPE records / bookkeeping I've been at it an embarassingly long time: I started studying back in March of 2019. Almost two years ago! Just too many fun and interesting things kept coming in the way!
Between teaching Linux+ to a group of students, with passing CTT+, Linux+, CySA+ and CRTP, as well as classes on DFIR and PKI it was just tooooo tempting! And Ansible was just a little too boring! So as I said before: "booo!" to my lack of discipline! Dragging my feet on EX407 caused me to almost lose my RHCSA/RHCE certifications, because they needed to be renewed.
But enough about that! Let's talk some interesting points!
All those study materials I linked to, especially Tomas' practice exam, proved to be absolute gold. Without them I wouldn't have passed, because pass I did! Out of a max of 300 (I think?) and with a passing grade of 210 I scored 239 points.
I dropped points mostly due to inexperience with Jinja2 templating and its logic (tests, loops) and with Ansible Galaxy and requirements-files. Out of 16 tasks I knew up front that I'd fail 3 of them because I couldn't get the playbooks to work correctly. Lessons learned and I'll definitely try to practice more in my homelab!
Finally, after being one of the first 100 people to take a Red Hat Kiosk exam, I'll also weigh in on Red Hat's remote, at-home exams. RH had fallen behind to its competitors in that regard, still forcing students to come in to testing centers. What with Covid-19, that strategy needed to change, fast. So they did, in September of this year.
All in all I very much appreciate Red Hat's remote, at-home testing. To sum it up: you flash a RH-provided Linux image to a USB drive, plug that into your PC and boot it up. This turns your private PC into a RH Kiosk system, exactly like they use in their official testing centers! The only vexing part of the setup is that you need TWO functioning web cams, one of which MUST be cabled and pointed at you from the side.
Overall, the bootable Kiosk Linux is great. It provides pre-exam setup testing to ensure you can actually take the exam. From there on out things work exactly like, or actually better than, the Kiosk at the testing center. Testing from home is absolutely great! After my bad experiences with EX413 I'd been turned off of RH's exams, but this has turned me around a bit.
I'm happy to have passed EX407! Time to go over my plan for the next few months! I have a few pen-testing classes lined up and will also need to prepare for teaching my next group of students!
kilala.nl tags: work, studies,
View or add comments (curr. 0)
2020-12-17 08:39:00
I've been studying on and off for the EX407 Ansible exam for ... lemme check... 1.8 years now. Started in March of 2019, hoping to renew my RHCE in time, but then I kept on getting distracted. Two certs and three other studies further, I still need to pass EX407 to renew my RHCE. Way to go on that discipline! ( ; ^_^)
Anywho, there's a few resources that proved to be helpful along the way; thought I'd share them here.
kilala.nl tags: work, sysadmin, studies,
View or add comments (curr. 0)
2020-12-08 14:11:00
The following article is an exploit write-up which I published on my Github repository. It describes a security vulnerability I found in Tibco's software, which I submitted to the vendor through proper responsible disclosure. Now that Tibco have finished their follow-up, I am allowed to publish my findings.
During a pen-test of an internally developed application, I discovered that the engineers in question had re-used a commercial Java library for password obfuscation.
While their application was not part of a Tibco stack, nor did it use Tibco, they did make use of Tibco's "ObfuscationEngine". On Tibco systems, this tool is used to obfuscate (and sometimes encrypt) passwords for safe storage in configuration files.
My colleague Wouter R. referred me to a project from a few years ago, which apparently did the exact same attack: Thomas D's "tibcopasswordrevealer", built in Python. At the time of my pentest, nor up until an hour ago, was I aware of this previous work. Until my colleague pointed out the project, I had only found people re-using the "tibcrypt.jar" library.
Tibco's documentation states that there are three modes of operation for this ObfuscationEngine tooling:
This write-up pertains to #3 above. The documentation states both:
"The fixed key […] does not provide the same level of security as the use of a machine key or a custom encryption key. It is used to encrypt an administration domain’s password.”
and
"Passwords encrypted using Obfuscate Utility cannot be decrypted. Ownership is with customers to remember passwords in clear text. There is no utility provided by TIBCO to decrypt passwords encrypted using Obfuscate Utility.”.
Secrets obfuscated using the Tibco fixed key can be recognized by the fact that they start with the characters #!.
For example:
#!oe2FVz/rcjokKW2hIDGE7nSX1U+VKRjA
The first statement does not make clear the risks that are involved, while the second statement is blatantly incorrect.
On Tibco's forums, but also on other websites, people have already shared Java code to decrypt secrets encrypted with this fixed key.
For example:
I performed a pen-test on an application, where the above-mentioned ObfuscationEngine had made its way into their in-house code. Because I did not have access to Tibco's copyrighted libraries, I was happy to find one source online that had the older “tibcrypt.jar” available.
-> https://mvnrepository.com/artifact/tibco-ems/tibcrypt/4.1
By analyzing this JAR file, I recovered the fixed key. Using that I wrote a small Java utility that can decrypt any secret that was encrypted using the Tibco fixed key regardless whether Tibco libraries are available.
The code is provided in my Github repository as “decrypt.java”.
Regardless of country, customer, network or version of Tibco, any secret that was obfuscated with Tibco's ObfuscationEngine can be decrypted using my Java tool. It does not require access to Tibco software or libraries.
All you need are exfiltrated secret strings that start with the characters #!.
This is not going to be fixed by Tibco, this is a design decision also used for backwards compatibility in their software.
Compile with:
javac decrypt.java
Examples of running, with secrets retrieved from websites and forums:
	java Decrypt oe2FVz/rcjokKW2hIDGE7nSX1U+VKRjA
	7474

	java Decrypt BFBiFqp/qhvyxrTdjGtf/9qxlPCouNSP
	tibco
I have shared my findings internally with my client. I have advised them to A) stop including Tibco's copyrighted classes and libraries into their own Java applications, B) replace all secrets encrypted using this method, as they should be considered compromised.
The proof of concept code has been shared with the customer as part of the pen-test report.
I reported this situation to Tibco's responsible disclosure team (security@tibco.com) on September 9th 2020.
On December 8th Tibco's security team responded that they have updated the Tibco administrators documentation to make it clear that the fixed key method of ObfuscationEngine should not be considered secure.
-> https://docs.tibco.com/pub/runtime_agent/5.11.1/doc/pdf/TIB_TRA_5.11.1_installation.pdf?id=3
The text now reads:
"The fixed key is compatible with earlier versions of TIBCO Runtime Agent but should not be treated as secure. A machine key or custom encryption key should be used whenever possible."
No CVE was awarded as the vendor did not recognize this as a vulnerability. This is intended functionality, which "works as designed".
kilala.nl tags: work,
View or add comments (curr. 1)
2020-12-05 22:59:00
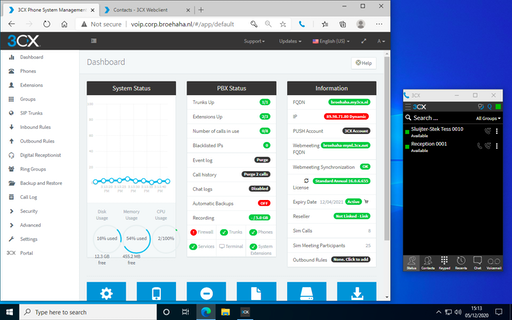
In order to simulate a "work-from-home" (WFH) situation in the lab, I'm very happy to test the 3CX web client. Their webapp supports a lot of the productivity features you'd expect and works with a browser extension (Edge and Chrome) to make actual calls. No need to install a soft-phone application, just grab the browser extension!
The RDP protocol supports the redirection of various types of hardware, including audio input and output. This requires that you enable this for your target host (or in general), for example in Royal TSX you would edit the RDP connection, go to Properties > Redirection and put a check in the box for Record audio from this computer. Also select Bring audio to this computer.
With a Windows target host it'll now work without a hassle.
Linux is a different story, but that's because the xRDP daemon needs a little massaging. Specifically, you will need to build a module or two extra for PulsaAudio. This isn't something you can easily "apt install", but the steps are simple enough. Full documentation over here.
After building and installing the modules, you'll need to logout and log back in. After that playing audio works and PulseAudio will have detected your system's microphone as well.
kilala.nl tags: homelab, sysadmin,
View or add comments (curr. 0)
2020-12-05 16:15:00
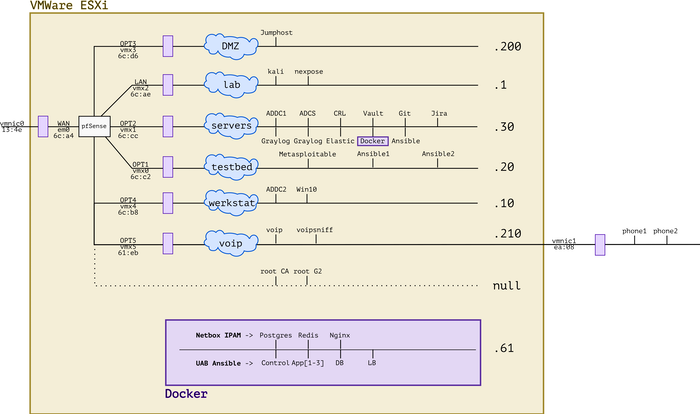
It's been a busy year! Between adding new hardware, working with Ansible and messing with forensics and VOIP, the lab has evolved. I'm very lucky to have all of this at my disposal and I'm grateful to everybody's who's helped me get where I am today. :)
kilala.nl tags: work, sysadmin, homelab,
View or add comments (curr. 0)
2020-12-05 15:25:00
Just yesterday, a lucrative dumpster dive netted me two brandnew IP desk phones, very spiffy Grandstream GPX2130 models. Because studying for my upcoming Ansible exam isn't much fun (OMG two weeks!!), procrastination struck!
Let's add VOIP to my simulated company Broehaha in my homelab!
Until this weekend I had zero experience with VOIP, SIP and the likes beyond using Cisco phones as an end-user. I'd heard plenty of colleagues talk about Asterisk and I remember hacking an Asterisk server in the PWK labs at Offensive Security, but that's about as far as my exposure went.
Wanting to save time and to simulate an actual company, I quickly gave up on both Asterisk and FreeSwitch. As the meme goes: "Ain't nobody got time fo' that!"
A little search further led me to 3CX, a commercial PBX solution that provides a free edition for (very limited) small environments. They offer a Debian-based soft-appliance that you can deploy from ISO anywhere you like.
So:
Last night I spent from 2200-0100 mucking around with 3CX because no matter what I tried, the GXP2130 would not show up on the admin UI. The phone's in the network just fine and could also talk to 3CX, but there were a few steps missing.
Continuing this morning, I used tcpdump and other tools to ascertain that:
After lunch, things fell into place :)
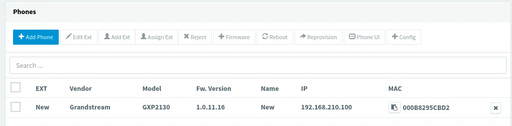
So... I upgrade the phone's firmware in four steps, using an on-prem update server. Then, after resetting the phone to factory defaults it showed up just fine and I could add it to one of my extensions!
The cool part is that 3CX comes with a web UI for end-users, that also works with their browser extension for Chrome or Edge. Now I can simulate a working-from-home situation, with one user on a Windows 10 VM calling the "reception" on the Grandstream phone. Or vice versa.
kilala.nl tags: work, sysadmin, homelab,
View or add comments (curr. 0)
2020-12-05 13:43:00
With many thanks to my friends at ITVitae and some dumpster diving I snagged two brand-new Grandstream GXP2130 IP phones, to practice VOIP in my homelab. They're pretty sexy phones! Nice build quality and a very decent admin interface: a great first step into the world of VOIP / SIP.
Out of the box, these two phones came with the dated 1.0.7.25 firmware. No matter what I tried, they refused to upgrade to the current version 1.0.11.16. Pointing them at the Granstream firmware site? Nothing. Pointing them at a local web server with the 1.0.11.16 firmware? Nothing.
After a bit of searching, I found a helpful thread on the GS support forums that suggests that the firmware version gap is simply too great. We need to apply a few of the in-between versions, one by one.
As a work-around I built my own firmware upgrade server, in the VOIP network segment of my homelab. A simple CentOS 7 box with Apache. I then did the following:
cd /tmp
wget http://www.grandstream.com/sites/default/files/Resources/RingTone.zip
wget http://firmware.grandstream.com/Release_GXP2130_1.0.7.97.zip
wget http://firmware.grandstream.com/Release_GXP2130_1.0.8.56.zip
wget http://firmware.grandstream.com/Release_GXP2130_1.0.9.135.zip
wget http://firmware.grandstream.com/Release_GXP2130_1.0.11.3.zip
wget http://firmware.grandstream.com/Release_GXP2130_1.0.11.16.zip

unzip RingTone.zip
for FILE in $(ls Release*zip); do unzip $FILE; done

cd /var/www/html
sudo mkdir 7 8 9 11

sudo cp /tmp/ring* 7/; sudo cp /tmp/Rel*.7.*/*bin 7/
sudo cp /tmp/ring* 8/; sudo cp /tmp/Rel*.8.*/*bin 8/
sudo cp /tmp/ring* 9/; sudo cp /tmp/Rel*.9.*/*bin 9/
sudo cp /tmp/ring* 11/; sudo cp /tmp/Rel*.11.*/*bin 11/

sudo chmod -R o+r *
From there on out, run a "sudo tail -f /var/log/httpd/access.log" to see if the phone is actually attempting to pick up the relevant update files.
Then, on the phone, login as "admin" and browse to Maintenance > Upgrade and Provisioning. Set the access method to HTTP. As the Firmware Server Path set the IP address of the newly built upgrade server (e.g. 192.168.210.100), followed by the version path. We will change this path for every version upgrade.
For example:
First update to 1.0.7.97: set the path, click Save and Apply, then at the top click Provision. You should see the phone downloading the firmware update in "access.log". Once the phone has rebooted, check the web interface for the current version number.
Then "lather, rince and repeat" for each consecutive version. After 7, upgrade to 8, then to 9, then to 11 (this works without issues). In the end you will have a Grandstream phone running 1.0.11.16, after starting at 1.0.7.25.
Afterwards: don't forget to reset the phone to factory defaults, so it will correctly join your PBX for auto-provisioning.
kilala.nl tags: work, sysadmin, homelab,
View or add comments (curr. 0)
2020-12-02 19:16:00
It's been a while since I've worked in my homelab, between my day-job and my teaching gig there's just been no time at all. But, with my EX407 around the corner it's time to hammer Ansible home!
Of course, it's tempting to get sidetracked! So when Tomas' Lisenet practice exam for EX407 suggests I need five VMs with RHEL, I go and find a way to build those post-haste. Now that I've been playing with Vagrant more often, that's become a lot easier!
First, there's a dependency: you will need to download and install a recent version of VMware's OVFTool. Make sure that its binary is in your $PATH.
After that, JosenK's Vagrant plugin for VMware ESXi makes life so, so easy! On my Linux workstation it was as easy as:
$ sudo apt install vagrant
$ vagrant plugin install vagrant-vmware-esxi
$ mkdir vagrant-first-try; cd vagrant-first-try
$ vagrant init
$ vi Vagrantfile
After which the whole Vagrantfile gets replaced as follows:
nodes = {
   "vagrant1.corp.broehaha.nl" => ["bento/centos-8", 1, 512, 50 ],
   "vagrant2.corp.broehaha.nl" => ["bento/centos-8", 1, 512, 50 ],
   "vagrant3.corp.broehaha.nl" => ["bento/centos-8", 1, 512, 50 ],
   "vagrant4.corp.broehaha.nl" => ["bento/centos-7", 1, 512, 50 ],
   "vagrant5.corp.broehaha.nl" => ["bento/centos-7", 1, 512, 50 ],
}

Vagrant.configure(2) do |config|
  nodes.each do | (name, cfg) |
    box, numvcpus, memory, storage = cfg
    config.vm.define name do |machine|

      machine.vm.box      = box
      machine.vm.hostname = name
      machine.vm.synced_folder('.', '/Vagrantfiles', type: 'rsync')

      machine.vm.provider :vmware_esxi do |esxi|
        esxi.esxi_hostname         = '192.168.0.55'
        esxi.esxi_username         = 'root'
        esxi.esxi_password         = 'prompt:'
        esxi.esxi_virtual_network  = "Testbed"
        esxi.guest_numvcpus        = numvcpus
        esxi.guest_memsize         = memory
        esxi.guest_autostart       = 'true'
        esxi.esxi_disk_store       = '300GB'

      end
    end
  end
end
To explain a few things:
Any requirements? Yup!
kilala.nl tags: work, sysadmin, homelab,
View or add comments (curr. 1)
All content, with exception of "borrowed" blogpost images, or unless otherwise indicated, is copyright of Tess Sluijter. The character Kilala the cat-demon is copyright of Rumiko Takahashi and used here without permission.