

2012-11-13 21:46:00
I've always been pretty "okay" about making backups. For years now I've been pulling drive images of both our Macbooks every month or two and both our systems run hourly backups to our NAS. Huzzah for Time Machine! Well, this weekend I got the chance to test our backups!
Having been bitten by the MMORPG bug after watching to much of SAO, I decided to save a lot of time (and money?) by closing the tab with worldofwarcraft.com and by reinstalling Warcraft 3. A few years back my brother-in-law Hans had given me the game for Christmas, so I still had the discs lying around. But! They're for PPC Macs only and obviously my Macbook has an Intel processor. Luckily you can download a Univerisal Binary version of the game through Battle.net (Blizzard's online store etc), after entering your CD keys. Which i promptly did.
Turns out that the whole Warcraft 3 game is a Universal Binary, except the bloody installer! WTF Blizzard?!
The solution is easy, yet stupid: install Snow Leopard (Mac OS 10.6) onto an external USB drive, which still has Rosetta (OS X's way to run PPC code on an Intel system). Everything went fine and I got the game installed. But when I tried to reboot to my Macbook's internal drive, I was greeted by the dreaded blinking question mark. Fudge! ( =_=)
The boot drive had gotten corrupted along the way. I have no clue whatsoever why, but it did. The only course of action, after I couldn't get the full disk encryption to open up, was to re-image the drive and restore from backups. The first part was easy: hook up my backup drive, boot from USB install stick and use Disk Utility to re-image. But then came the restore from Time Machine.
As a Unix admin I was over thinking the whole process! I was afraid that, if I were to simply reconnect the Time Machine backup drive, the TM software would erase everything and overwrite it all. So instead I tried to use the good old Migration Assistant, which usually is a great idea. But no matter what I tried, it failed: MA wouldn't see my backups over the network and they wouldn't show up when connected locally over USB either. Turns out there are two good reasons for this:
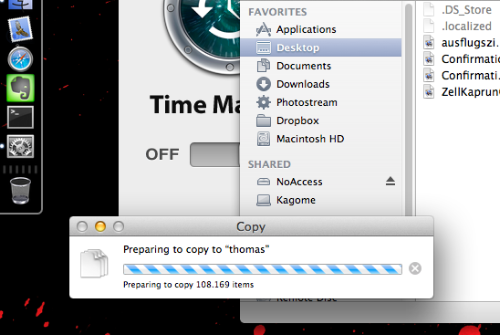
Turns out that what I was afraid of, really is the right way. So here's the course of action that works:
It could be that your restore borks once or twice, because a file is being locked by a running process. Most likely this is a cache in Library, or a plist locked by iCloud syncing. You could temporarily turn off all syncs and remove the offending files.
In my case, over 126.000 files were restored ringing in over 32GB.
View or add comments (curr. 0)
All content, with exception of "borrowed" blogpost images, or unless otherwise indicated, is copyright of Tess Sluijter. The character Kilala the cat-demon is copyright of Rumiko Takahashi and used here without permission.