

2021-07-29 14:45:00
Last week was awesome! It was the last Friday before summer break, so I decided to move the class on Vagrant and Docker forward. This would give my Linux+ students a few cool things to play with during their holiday!
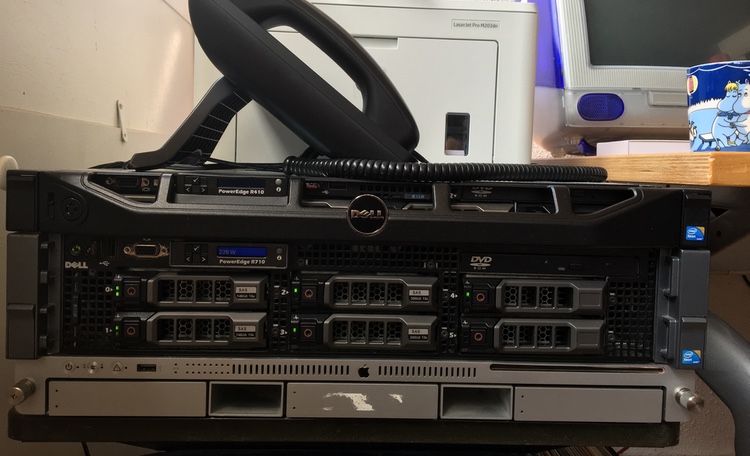
Next to that very fun day, one of my colleagues at ITVitae also gifted me a piece of old gear: a lovely, 2009 Apple XServe 3.1. Dick would've loved that, what with us both being Apple-geeks.
The drives were wiped, so I've found a way to image the MacOS 10.11 installer onto one of them. Aside from that: it has dual Xeons like my R410 and R710, 3x2TB of disks (one of which will move to the R710 for my lab) and 24GB of RAM.
This baby might be noisy and a bit underpowered, but it'll make a great Docker-host to complete my lab. Awww yeah!
kilala.nl tags: homelab, work, studies,
View or add comments (curr. 0)
2021-06-20 21:19:00
A few weeks ago I noticed that my Win2012 trial licenses are no longer tennable: a big change to my homelab is needed! Since then I've worked dilligently on a few projects, all happening in parallel.
That's a lot of stuff going on!
As the title of this post says: failure is a great teacher and boy did I have a lot of failures! 😂
For now there's too much to sum up in great detail, so I'll get back to the deets later. For now, some stuff I ran into:
After a weekend with lots of hard work, my AD domain is stable and usable again. All GPOs work again, the syncing between DCs works, the DFSR for SYSVOL works again. And the migration of the issuing CA to 2019 has also completed, with hosts being able to auto-enroll and validate certs again.
There's so much more to do though! Thank ${Deity} for my Jira boards!
kilala.nl tags: work, studies, homelab,
View or add comments (curr. 0)
2021-02-06 19:35:00
As part of my studying for the CDP course, I've expanded my homelab with a private instance of Gitlab. I've got to say: I like it! A lot. It's good software!
To accomodate my builds I expanded the RAM on my Docker host VM and set up three "gitlab-runners" to pick up jobs from Gitlab CICD pipelines. Microsoft's documentation is outstanding: the runners were installed and configured within minutes.
The only thing I really disliked was their instructions to "wget https://some-url | bash -". That always feels so fscking scary.
As part of my change management process the Docker host of course needed a reboot, to see if things some up correctly. They did and the "gitlab-runner" process was there as well. But it wasn't picking up any jobs! Only when I SSHd into the host and ran "sudo gitlab-runner run" would jobs start flowing.
At first I thought I just didn't understand the concept of the runner process well enough. Maybe I hadn't set them up correctly? Then I decided to do the logical thing: check the logs. I've been teaching my students to do so, so why didn't I? :D
"sudo systemctl status gitlab-runner -l" showed me the following:
$ sudo systemctl status gitlab-runner -l
â— gitlab-runner.service - GitLab Runner
Loaded: loaded
Active: active
...
Feb 06 19:24:37 gitlab-runner[20361]: WARNING: Checking for jobs... failed
runner=REDACTED status=couldn't execute POST against https://REDACTED/api/v4/jobs/request:
Post https://REDACTED/api/v4/jobs/request: x509: certificate signed by unknown authority
The self-signed cert isn't too surprising, since I still have a backlog item to get that fixed. I wanted to first get the basics right before getting a proper cert from my PKI. But I thought I had dealt with that by registering the runner with a CA cert override.
Checking "/etc/gitlab-runner/config.toml" showed me where I had gone wrong: the CA cert override path was relative, not exact.
[[runners]]
  name = "REDACTED"
  url = "https://REDACTED"
  token = "REDACTED"
  tls-ca-file = "./gitlab.pem"
  executor = "docker"
I had assumed that the cert would be picked up by the runner config and stored elsewhere, instead of being referenced from the file system. Wrong! I made sure to copy the self-signed cert to "/etc/gitlab-runner/gitlab.pem" after which I corrected the "config.toml" file to use the correct path.
One quick restart of the runner service and now jobs are automatically picked up!
kilala.nl tags: work, studies, homelab,
View or add comments (curr. 3)
2020-12-05 22:59:00
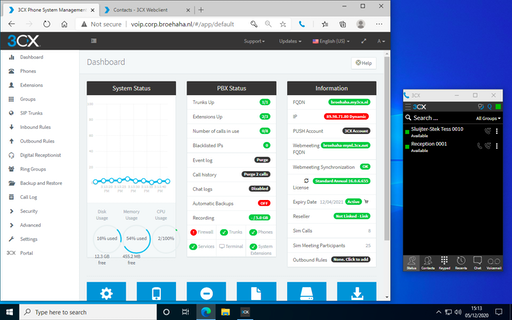
In order to simulate a "work-from-home" (WFH) situation in the lab, I'm very happy to test the 3CX web client. Their webapp supports a lot of the productivity features you'd expect and works with a browser extension (Edge and Chrome) to make actual calls. No need to install a soft-phone application, just grab the browser extension!
The RDP protocol supports the redirection of various types of hardware, including audio input and output. This requires that you enable this for your target host (or in general), for example in Royal TSX you would edit the RDP connection, go to Properties > Redirection and put a check in the box for Record audio from this computer. Also select Bring audio to this computer.
With a Windows target host it'll now work without a hassle.
Linux is a different story, but that's because the xRDP daemon needs a little massaging. Specifically, you will need to build a module or two extra for PulsaAudio. This isn't something you can easily "apt install", but the steps are simple enough. Full documentation over here.
After building and installing the modules, you'll need to logout and log back in. After that playing audio works and PulseAudio will have detected your system's microphone as well.
kilala.nl tags: homelab, sysadmin,
View or add comments (curr. 0)
2020-12-05 16:15:00
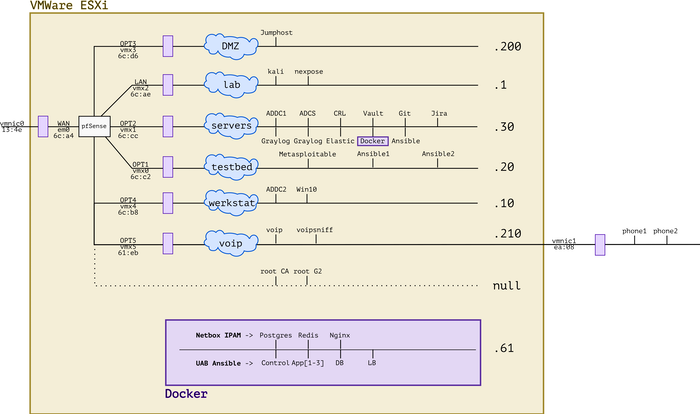
It's been a busy year! Between adding new hardware, working with Ansible and messing with forensics and VOIP, the lab has evolved. I'm very lucky to have all of this at my disposal and I'm grateful to everybody's who's helped me get where I am today. :)
kilala.nl tags: work, sysadmin, homelab,
View or add comments (curr. 0)
2020-12-05 15:25:00
Just yesterday, a lucrative dumpster dive netted me two brandnew IP desk phones, very spiffy Grandstream GPX2130 models. Because studying for my upcoming Ansible exam isn't much fun (OMG two weeks!!), procrastination struck!
Let's add VOIP to my simulated company Broehaha in my homelab!
Until this weekend I had zero experience with VOIP, SIP and the likes beyond using Cisco phones as an end-user. I'd heard plenty of colleagues talk about Asterisk and I remember hacking an Asterisk server in the PWK labs at Offensive Security, but that's about as far as my exposure went.
Wanting to save time and to simulate an actual company, I quickly gave up on both Asterisk and FreeSwitch. As the meme goes: "Ain't nobody got time fo' that!"
A little search further led me to 3CX, a commercial PBX solution that provides a free edition for (very limited) small environments. They offer a Debian-based soft-appliance that you can deploy from ISO anywhere you like.
So:
Last night I spent from 2200-0100 mucking around with 3CX because no matter what I tried, the GXP2130 would not show up on the admin UI. The phone's in the network just fine and could also talk to 3CX, but there were a few steps missing.
Continuing this morning, I used tcpdump and other tools to ascertain that:
After lunch, things fell into place :)
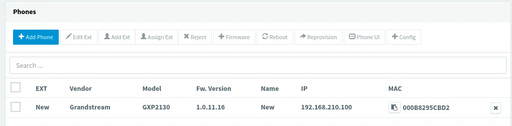
So... I upgrade the phone's firmware in four steps, using an on-prem update server. Then, after resetting the phone to factory defaults it showed up just fine and I could add it to one of my extensions!
The cool part is that 3CX comes with a web UI for end-users, that also works with their browser extension for Chrome or Edge. Now I can simulate a working-from-home situation, with one user on a Windows 10 VM calling the "reception" on the Grandstream phone. Or vice versa.
kilala.nl tags: work, sysadmin, homelab,
View or add comments (curr. 0)
2020-12-05 13:43:00
With many thanks to my friends at ITVitae and some dumpster diving I snagged two brand-new Grandstream GXP2130 IP phones, to practice VOIP in my homelab. They're pretty sexy phones! Nice build quality and a very decent admin interface: a great first step into the world of VOIP / SIP.
Out of the box, these two phones came with the dated 1.0.7.25 firmware. No matter what I tried, they refused to upgrade to the current version 1.0.11.16. Pointing them at the Granstream firmware site? Nothing. Pointing them at a local web server with the 1.0.11.16 firmware? Nothing.
After a bit of searching, I found a helpful thread on the GS support forums that suggests that the firmware version gap is simply too great. We need to apply a few of the in-between versions, one by one.
As a work-around I built my own firmware upgrade server, in the VOIP network segment of my homelab. A simple CentOS 7 box with Apache. I then did the following:
cd /tmp
wget http://www.grandstream.com/sites/default/files/Resources/RingTone.zip
wget http://firmware.grandstream.com/Release_GXP2130_1.0.7.97.zip
wget http://firmware.grandstream.com/Release_GXP2130_1.0.8.56.zip
wget http://firmware.grandstream.com/Release_GXP2130_1.0.9.135.zip
wget http://firmware.grandstream.com/Release_GXP2130_1.0.11.3.zip
wget http://firmware.grandstream.com/Release_GXP2130_1.0.11.16.zip

unzip RingTone.zip
for FILE in $(ls Release*zip); do unzip $FILE; done

cd /var/www/html
sudo mkdir 7 8 9 11

sudo cp /tmp/ring* 7/; sudo cp /tmp/Rel*.7.*/*bin 7/
sudo cp /tmp/ring* 8/; sudo cp /tmp/Rel*.8.*/*bin 8/
sudo cp /tmp/ring* 9/; sudo cp /tmp/Rel*.9.*/*bin 9/
sudo cp /tmp/ring* 11/; sudo cp /tmp/Rel*.11.*/*bin 11/

sudo chmod -R o+r *
From there on out, run a "sudo tail -f /var/log/httpd/access.log" to see if the phone is actually attempting to pick up the relevant update files.
Then, on the phone, login as "admin" and browse to Maintenance > Upgrade and Provisioning. Set the access method to HTTP. As the Firmware Server Path set the IP address of the newly built upgrade server (e.g. 192.168.210.100), followed by the version path. We will change this path for every version upgrade.
For example:
First update to 1.0.7.97: set the path, click Save and Apply, then at the top click Provision. You should see the phone downloading the firmware update in "access.log". Once the phone has rebooted, check the web interface for the current version number.
Then "lather, rince and repeat" for each consecutive version. After 7, upgrade to 8, then to 9, then to 11 (this works without issues). In the end you will have a Grandstream phone running 1.0.11.16, after starting at 1.0.7.25.
Afterwards: don't forget to reset the phone to factory defaults, so it will correctly join your PBX for auto-provisioning.
kilala.nl tags: work, sysadmin, homelab,
View or add comments (curr. 0)
2020-12-02 19:16:00
It's been a while since I've worked in my homelab, between my day-job and my teaching gig there's just been no time at all. But, with my EX407 around the corner it's time to hammer Ansible home!
Of course, it's tempting to get sidetracked! So when Tomas' Lisenet practice exam for EX407 suggests I need five VMs with RHEL, I go and find a way to build those post-haste. Now that I've been playing with Vagrant more often, that's become a lot easier!
First, there's a dependency: you will need to download and install a recent version of VMware's OVFTool. Make sure that its binary is in your $PATH.
After that, JosenK's Vagrant plugin for VMware ESXi makes life so, so easy! On my Linux workstation it was as easy as:
$ sudo apt install vagrant
$ vagrant plugin install vagrant-vmware-esxi
$ mkdir vagrant-first-try; cd vagrant-first-try
$ vagrant init
$ vi Vagrantfile
After which the whole Vagrantfile gets replaced as follows:
nodes = {
   "vagrant1.corp.broehaha.nl" => ["bento/centos-8", 1, 512, 50 ],
   "vagrant2.corp.broehaha.nl" => ["bento/centos-8", 1, 512, 50 ],
   "vagrant3.corp.broehaha.nl" => ["bento/centos-8", 1, 512, 50 ],
   "vagrant4.corp.broehaha.nl" => ["bento/centos-7", 1, 512, 50 ],
   "vagrant5.corp.broehaha.nl" => ["bento/centos-7", 1, 512, 50 ],
}

Vagrant.configure(2) do |config|
  nodes.each do | (name, cfg) |
    box, numvcpus, memory, storage = cfg
    config.vm.define name do |machine|

      machine.vm.box      = box
      machine.vm.hostname = name
      machine.vm.synced_folder('.', '/Vagrantfiles', type: 'rsync')

      machine.vm.provider :vmware_esxi do |esxi|
        esxi.esxi_hostname         = '192.168.0.55'
        esxi.esxi_username         = 'root'
        esxi.esxi_password         = 'prompt:'
        esxi.esxi_virtual_network  = "Testbed"
        esxi.guest_numvcpus        = numvcpus
        esxi.guest_memsize         = memory
        esxi.guest_autostart       = 'true'
        esxi.esxi_disk_store       = '300GB'

      end
    end
  end
end
To explain a few things:
Any requirements? Yup!
kilala.nl tags: work, sysadmin, homelab,
View or add comments (curr. 1)
All content, with exception of "borrowed" blogpost images, or unless otherwise indicated, is copyright of Tess Sluijter. The character Kilala the cat-demon is copyright of Rumiko Takahashi and used here without permission.