

2017-05-09 10:24:00
A bit over a year ago I first started working with Microsoft's Active Directory, integrating it with BoKS Access Control. At the time, I was impressed by Windows Server 2012 and 2016 and the ease with which I could set up an AD forest with users.
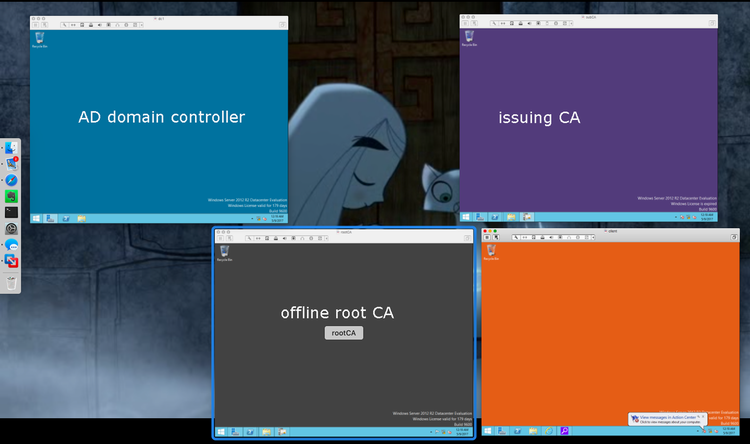
I'm now learning how to build a two-tier PKI infrastructure, after seeing them in action at various previous clients. I've been on the consuming end of PKI for years now and I thought it was time to really know how the other end works as well! I must say that I love Microsoft's generosity when it comes to documentation! Not only do they provide proper product docs, but they also have online tutorials in the form of TLGs: test lab guides. Using these, you can self-teach the basics of a subject, and then build up from there.
The 2012 Base TLG helps you build a basic AD forest of systems. I can follow it up with the two-tier PKI infrastructure TLG, which helps me set up an offline root CA, and an issuing CA, along with automatically enrolling any new systems in the networkt that need SSL certs. Awesome!
I'm similarly extatic about the performance of my Macbook Air. It's a tiny, super-portable system, but it still doesn't balk at running my usual applications plus four full-fledged Windows Server 2012 hosts. Nice!
EDIT:
Ammar Hasayen also did a nice write-up, which appears to be based upon the two-tier PKI TLG but which adds additional details.
Also, Microsoft also offer a third great resource, their MVA: Microsoft Virtual Academy. They also have a course on two-tier PKI with ADCS.
kilala.nl tags: work, windows,
View or add comments (curr. 0)
2017-05-09 08:54:00
I can't believe such a small, silly thing had me going for ten minutes!
When trying to retrieve a signed certificate from my ADCS rootCA, I kept getting a "file not found" error:
> certreq retrieve 2 .subCA.corp.contoso.com_subCA.crt
: The system cannot find the file specified. 0x80070002 (WIN32: 2)
Googling didn't lead to many results, but then I realized: Windows commands need to discern between variables and values, just like any OS. Doh! Forgot the minus!
> certreq -retrieve 2 .subCA.corp.contoso.com_subCA.crt
Works just fine!
kilala.nl tags: work, windows,
View or add comments (curr. 0)
2007-11-14 17:17:00
A dutch translation of this page, can be found here, on my Wiki.
During my second semester at Hogeschool Utrecht I got into my first group assignment. The five of us had to work together on a project for Kijk op Leerlingen 1, which is a course focussing on student identity and psychology.
School expects us to store all of our reports and materials on a dedicated Sharepoint site. Now, you know that when multiple people start working on the same documents, that things are going to get messy. So in order to prevent mayhem, I've created a short HOWTO for my project buddies.
With software like Sharepoint it's very easy to start mixing up versions of documents. For example, let's say that both Badegul and Arjan have downloaded the file called Foobar.doc. Both of them are making changes to the document on their own computers. First Arjan uploads the new document to Sharepoint. Then Badegul does the same.
Now there's a problem! Because all the work that Arjan has done, has now been overwritten by Badegul's document. All of his work is lost. Of course, it's still stored on his own computer, but that's besides the point.
In order to prevent multiple people from working on the same document, at the same time, here are some simple rules. All of this is explained in the video below.
One of the risks in working this way is that one person can keep a file locked indefinitely. So please, keep an eye out! If you're done working for now, please upload your file and check it in. Don't keep a document checked out, unless you're really working on it.
Click here to open or download the movie.
If you're in a situation where multiple people need to work on the same document, then things get interesting.
Put one person in charge of the document; this is the person who'll do the checkout and checkin. Now everyone can start working, BUT with one difference. The person in charge has the document itself. All the others only send their -changes- to this person. Thus, they tell the person in charge exactly what needs to be changed and where.
The person in charge then gathers all the changes into the main document and uploads the new version to Sharepoint.
kilala.nl tags: school, software, windows,
View or add comments (curr. 0)
2007-09-18 08:16:00
Every freshman at Hogeschool Utrecht is required to take a class in Basic ICT skills. The class teaches both young and old about the learning infrastructure in place at HU. Classes cover everything from using Powerpoint and Word, to using the online tools Sharepoint and Osiris.
While I fully agree that this course is an important one, I do feel it's a bit wasted on me. I've been in IT for seven years now! ^_^ I've worked with Sharepoint on at least two occasions before and Osiris is really quite simple if you RTFM.
Since the Basic ICT skills class interferes with two of my other classes, I'm trying to get a Get out of jail free! card. I've spoken with my mentor at school and she asked me to do one of the bigger assignments: a Powerpoint presentation introducing myself. Naturally I complied, seeing as how I'll have to give presentations later on in the school year as well. Might as well create the master slides and templates now, right? ;)
And here it is! Sorry 'bout the dutch, all you USAdians...
Click here for the introduction.
EDIT:
Hmm... The text is quite illegible in the clip that's shown on this page. Things are much better if you download the clip and watch it on its own. You can download it from here, by grabbing IntroThomas.mov.
kilala.nl tags: school, software, windows,
View or add comments (curr. 0)
2007-09-11 14:42:00
Like many other companies and organizations, Hogeschool Utrecht uses specialized software for to facilitate collaboration between students and faculty. HU makes use of Microsoft Sharepoint, which is a web based toolset. Sharepoint is pretty damn versatile in what it can do for you, though we'll only used the most rudimentary functions.
Unfortunately, all those functions tend to make Sharepoint a little bit unwieldy. Kind of like how MS Office is bloated as well. On this page I'll gather tips and tricks that should make using Sharepoint just little bit easier.
You will be storing a lot of your school work in the Shared Documents folders on Sharepoint. That way teachers and faculty will be able to read and download your work. However, it's only natural that you don't want all of your fellow students to rifle through your stuff. That's why setting access permissions is important.
Here's how you can secure a folder that holds your school work.
Sharepoint is great because it lets you access all your files and information through a web browser. Unfortunately this interface sucks when you want to copy a lot of files and directories at the same time. Luckily, there -is- a way to do it easily. The downside is that this requires Windows 2000 (or higher) and Internet Explorer 6 (or higher).
The method we'll use to copy loads of files is called the Explorer View. It allows you to open your Sharepoint directories in Windows Explorer. That's the same piece of software you use to work with files and directories on your PC.
If that doesn't work, try it as follows.
You can now drag files from your computer into this view. You can also create new directories much easier. And if you want you can copy a whole directory tree in there!
You -can- use Firefox or Safari to access Sharepoint. However, many of the advanced features will not work, like the MS Office integration. Luckily, most of those features are crap anyway so you won't use them ^_^ Sadly, the Explorer View does -not- work in these browsers, since it requires Internet Explorer 6+. For that feature, you'll need to use Windows. Or just live without the EV.
If you happen to be using Windows inside a Parallels virtual machine, then there's one nasty glitch with the Explorer View. Mac OS X automatically creates hidden files inside each directory, called .DStore. When you're copying a whole directory, these files will cause your copy to fail. It's better to create the directory and then copy all files in it to the Sharepoint directory manually.
Over at the HU each student is assigned 100 MB of storage space for their files on Sharepoint. Once your space runs out you won't be able to add any new stuff. That would be bad, because you'll need to be able to upload new schoolwork. Right?
One tricky part about Sharepoint is that, if you erase a file, it isn't really gone yet. Just like on your PC, Sharepoint keeps your trash in a trashcan that needs to be empty. And unfortunately the size of the trashcan also weighs in against your storage space.
So if you start getting e-mails from Sharepoint, warning you about your space usage, click on the link in the mail. That will take you to your usage report page. On that page you will also find a link to your trashcan. Click it and remove all of the files in the trash. And presto! Your Sharepoint site can breathe again!
kilala.nl tags: school, software, windows,
View or add comments (curr. 0)
2007-03-13 20:25:00
I'm well fed up with the whole PCMCIA switcheroo that I had gotten into to run my stand-by duties. I finally went out to Media Markt to get myself a Wifi card of my own. Who cares if the laptop belongs to $CLIENT? I want to work dammit! X[
I bought the Linksys WPC54g which is the first card that I'd borrowed from a colleague. Back then the card worked a treat and I had no problems whatsoever. But this time around, nothing but trouble! ;_; I think the crucial difference lies in the fact that the card I bought is v3, as opposed to either v2 or v4 (which was what I'd borrowed earlier). Incidentally, I'm running Windows 2000 on this Thinkpad.
Installing the card seemed to work alright: the driver installed perfectly, the card was recognized and the configuration utility installed as well. But for some reason the config util would keep on reporting the card as "WPC54g is inactive", suggesting a driver problem.
Well... A little digging around led me to this thread at the Linksys fora. It seems that the configuration tool (aka "Network monitor") is actually a piece of shit software, that doesn't work properly with the WPC54gv3 *grr*. As was suggested in the thread I installed McAfee Wireless Security, which is an alternative and free configuration tool for Wifi cards.
And lo and behold! It recognized the card and found my Wifi network. Got me connected without a problem. Thank God for McAfee! (Never thought I'd say that!)
Needless to say that my trust in Linksys has gone down a bit. All in all this took me a good two hours, which has well soured my mood :/
kilala.nl tags: annoying, windows, other tech, sysadmin,
View or add comments (curr. 3)
2006-06-01 00:00:00
After reading through my small write-up on Nagios clients on UNIX you may also be interested in the same story for Windows systems.
Since Nagios was originally written with UNIX systems in mind, it'll be a little bit trickier to get the same amount of information from a Windows box. Luckily there are a few tools available that will help you along the way.
For a quick introduction the Nagios clients, read the write-up linked above. Or pick it from the menu on the left.
|
|
||||||
|
Connection |
Srv -> Clnt |
Srv -> Clnt |
Srv -> Clnt |
Srv -> Clnt |
Clnt -> Srv |
Clnt -> Srv |
|
Security |
Password |
Password |
Password |
Access List |
Access List |
Encryption |
|
Configuration |
On client |
On client |
On client |
On client |
On client and |
On client |
|
Difficulty |
Moderate |
Moderate |
Moderate |
Hard |
Hard |
Moderate |
|
Resource |
unknown |
unknown |
9MB RAM |
unknown |
unknown |
30MB RAM |
|
Available |
*: Thanks to Jeronimo Zucco for pointing out that encryption in NSClient++ only works when used with the NRPE DLL.
**: Thanks to Anthony Montibello for pointing out recent changes to NC_Net, which is now at version 3.
***: Thanks to Kyle Hasegawa for providing me with resource usage infor on the various clients.
NSClient was originally written to work with Nagios when it was still called NetSaint: a long, long time ago. NSClient only provides you with access to a very small number of system metrics, including those that are usually available through the Windows Performance Tool.
Personally I have no love for this tool since it is quite fidgetty to use. In order to use NSClient on your systems, you will need to do the following.
You can now set up your services.cfg in such a way that each remote service is checked like so:
define service{
host_name remote-host
service_description D_ROOT
check_command check_nt_disk!C!85!95
}
Your check command definition would look something like this:
define command {
command_name check_nt_disk
command_line /usr/local/nagios/libexec/check_nt -H $HOSTADDRESS$ -p 1248 -v USEDDISKSPACE -l $ARG1$ -w $ARG2$ -c $ARG3
}
NRPEnt is basically a drop-in replacement for NRPE on Windows. It really does work the same way: on the Nagios server you run check_nrpe and on the Windows side you have plugins to run locally. These plugins can be binaries, Perl scripts, VBScript, .BAT files, whatever.
To set things up, you'll need the same things as with the normal NRPE.
You can now set up your services.cfg in such a way that each remote service is checked like so:
define service{
host_name remote-host
service_description D_ROOT
check_command check_nrpe!check_root
}
And in nrpent.cfg on the client you would need to include:
command[check_root]=C:\windows\system32\cscript.exe //NoLogo //T:10 c:\nrpe_nt\check_disk.wsf /drive:"c:/" /w:300 /c:100
Due to the limited use provided by NSClient, someone decided to create NSClient++. This piece of software is a lot more useful because it actually combines the functionality of the original NSClient and that of NRPEnt into one Windows daemon.
NSClient++ includes the same security measures as NRPEnt and NSClient, but adds an ACL functionality on top of that.
On the configuration side things are basically the same as with NSClient and NRPEnt. You can use both methods to talk to a client running NSClient++.
Unfortunately I haven't yet worked with SNMP on Windows systems, so I can't tell you much about this. I'm sure though that things won't be much different from the UNIX side. So please check the Nagios UNIX clients story for the full details.
To make proper use of monitoring through SNMP you'll need to:
Ufortunately the check_snmp script that comes with Nagios isn't flexible enough to let you monitor custom SNMP objects in a nice way. This is why I wrote the retrieve_custom_nagios script, which is available from the menu. Your service definition would look like this:
define service{
host_name remote-host
service_description D_ROOT
check_command retrieve_custom_snmp!.1.3.6.1.4.1.6886.4.1.4
}
As I said, I haven't configured a Windows SNMP daemon before, so I really can't tell you what the config would look like. Just look for options similar to "EXEC", which allows you to run a certain command on demand.
Just as is the case with UNIX systems you will need to dig around the MIB files provided to you by Microsoft and you hardware vendors to find the OIDs for interesting metrics. It's not an easy job, but with some luck you'll find a website where someone's already done the hard work for you :)
SNMP doesn't involve polling alone. SNMP enabled devices can also be configured to automatically send status updates do a so-call trap host. The downside to receiving SNMP traps with Nagios is that it takes quite a lot of work to get them into Nagios :D
To make proper use of monitoring through SNMP traps you'll need to:
There are -many- ways to get the SNMP traps translated for Nagios' purposes, 'cause there's many roads that lead to Rome. Unfortunately none of them are very easy to use.
NC_net is another replacement for the original NSClient daemon. It performs the same basic checks, plus a few additional ones, but it is not exentable with your own scripts (like NRPEnt is).
So why run NC_net instead of NSClient++? Because it is capable of sending passive check results to your Nagios server using a send_nsca-alike method. So if you're going all the way in passifying all your service checks, then NC_net is the way to go.
I haven't worked with NC_net yet, so I can't tell you anything about how it works. Too bad :(
UPDATE 31/10/2006:
I was informed by Marlo Bell of the Nagios mailing list that NC_net version 3.x does indeed allow running your own scripts and calling them through the NRPEnt interface! That's great to know, as it does in fact make NC_net the most versatile solution for running Nagios on your Windows.
Also, Anthony Montibello (lead NC_Net dev) tells me that NC_Net 3 requires dotNET 2.0.
kilala.nl tags: tutorial, sysadmin, nagios, windows,
View or add comments (curr. 7)
2006-01-27 06:36:00
We all know I love just about anything Apple Computers makes. There's no secret in that. However, I myself was very much amazed at the ease of setup when it comes to an Airport Wifi network. Yesterday I received the Airport Express base station and the Airport Extreme Card that I'd ordered trough the Apple Store. Looking forward to an evening filled with tweaking and fiddling, I was pleasantly surprised that all it took was fifteen minutes! And that includes installing the AE Card into my Powermac. It really is just as easy as plugging it in :)
I also had expected to have loads of problems to get Windows XP to work with Wifi, after hearing horror stories. And like I had feared Marli's laptop refused to talk to our newly built Wifi network "Kilala" ( original name, ain't it? :P ). However, that was easily fixed by completely reconfiguring the base station using the Windows software. Now the laptop had no qualms in connecting to the network and my Apple computers still attached flawlessly.
I'm one happy camper! Now all we need to do is to wait for Casema to deliver the cable modem, so we can get hooked up to the Internet again. The parcel gets delivered on Valentine's Day :D Awesome!
kilala.nl tags: apple, windows, other tech,
View or add comments (curr. 0)
All content, with exception of "borrowed" blogpost images, or unless otherwise indicated, is copyright of Tess Sluijter. The character Kilala the cat-demon is copyright of Rumiko Takahashi and used here without permission.