

2013-04-22 23:40:00
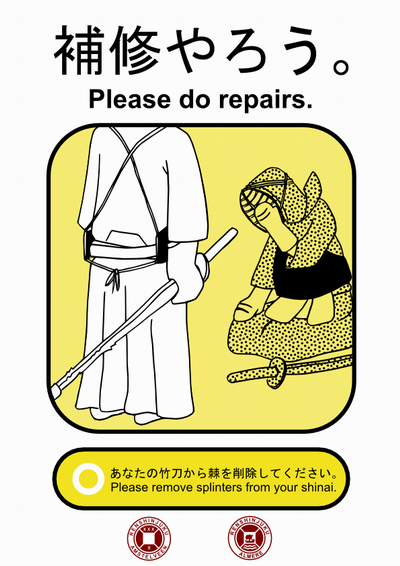
I recently found myself inspired by Bunpei Yorifuji's famous "Please do it..." campaign posters promoting etiquette in the Tokyo subway. They are catchy, they're a bit funny and they manage to drive home a message clearly.
"What if", I thought, "we applied the same design esthetic and message to kendo?". Thus work has started on a kendo-centric set of "Please do it..." posters. First up, based on last weekend's shinai inspection, is a poster about maintenance. It is everybody's duty to ensure their equipment is safe and that no harm can be done to your fellow kendoka. Loose splinters on shinai may pierce somebody's eye!
The Japanese sentences were made using JEDict and Google Translate, so I'm sure they're full of mistakes. Please correct me!
kilala.nl tags: kendo, creative,
View or add comments (curr. 0)
2013-04-20 08:13:00
With summer coming up I'm looking for ways to minimize wear and tear on my keikogi, the thick jackets we wear in kendo. The keikogi suck up loads of sweat and thus become pretty dirty very quickly. Unfortunately they also fade quickly and the rice-grain pattern also wears out pretty quickly if you launder them often.
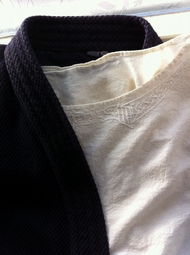
Traditionally, to keep expensive silk kimono clean, people wear juban which is a simple cotton undershirt. When I say "simple" I mean "less elaborate than a kimono", just check out the Pinterest on juban. There are even simpler juban, which look like thin white keikogi, sold by budogu such as Yamato. And that's exactly what I need, but I'll be damned if I pay $30-$40 for a simple shirt! That sewing machine isn't simply gathering dust in the attic!
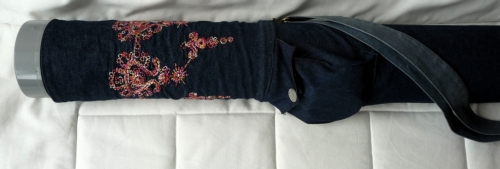
Because I don't have any cotton lying around just now, I've modified a few of my old projects. Years and years back, when I was still in the SCA, I made two cotton under-tunics. Meant to be worn under my full-length tunic as an extra layer, they were thigh-length and had long sleeves. In order for them to be worn as juban, I have shortened the sleeves and the body so they don't show from under my keikogi.
So now I have two neat undershirts for kendo... And they even have embroidery on them!
And to think I made those things fourteen years ago! Fourteen! ( O_o)
kilala.nl tags: kendo, creative,
View or add comments (curr. 2)
2012-11-23 22:59:00
Tonight was well spent :)
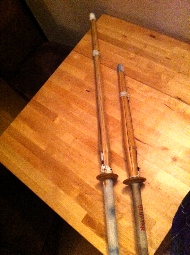
I managed to fix a further three shinai using the spare parts Ton-sensei left me and that Bert-sensei donated. Two shinai of the dojo and one of my own are now in tip-top shape again. As a side project I took a bunch of broken or split take and created a suburi shinai for inside the house. At 85cm it's still a bit too long (a wrong swing will hit the ceiling), but at least it's usable :)
Also, at 85cm it's much too long to be used officially as a kodachi (regulation size is 62cm), but maybe it'll be usable for some practice anyway ( ^_^)
kilala.nl tags: kendo, creative,
View or add comments (curr. 0)
2012-04-19 18:53:00
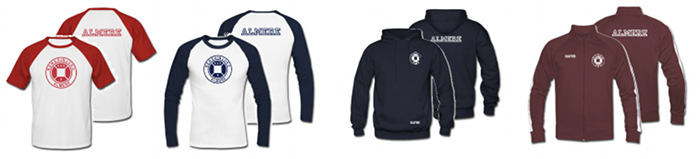
As I mentioned earlier today, I've designed a bunch of clothes for the Renshinjuku Kendo dojo. I originally started work on these designs sometime in january and gave it a fresh start with renewed vigour after designing the Renshinjuku Almere logo. My original goal was to have some RSJ-branded sports gear for my running practice, but after finishing the first designs I decided to set up a shop for all RSJ members. I've been dealing with Spreadshirt for a few years now and I've always been very happy with their work, so logically the shop's run by them.
For each design, there are four versions: one for Amstelveen, one for Almere, split into ladies' and gentlemen's fit. The full range of clothes consists of...
Shown above are the sports shirt (white) and the normal t-shirt (grey).
kilala.nl tags: creative, kendo,
View or add comments (curr. 0)
2012-04-19 07:15:00

This morning I received an email from Heeren-sensei, the founder of our kendo dojo. A few weeks back I'd sent him the vector files I'd made for the Amstelveen and Almere dojo logos. After discussing the matter for weeks and months I designed the Almere logo, based on the Amstelveen original and after a few rounds with Heeren-sensei, Ton-sensei nd Peter and Zicarlo sempai we'd come to a design to everybody's liking.
Now... That email contained a sample of badges that Heeren-sensei is having sourced from Pakistan, based on the vector files I put together. I'd lie if I said I wasn't at least a little proud (^_^;) IMNSHO, the badges look awesome! If I can I'll order at least three badges: one for my gi, one for my next gi and one for a sweater.
Oddly, I seem to have forgotten to post photos of the clothing I've designed. I'll do that RSN. I've had some great compliments from students and teachers alike :) Bob and Nick were so darn happy last saturday, strutting their stuff in the dressing room. I have to admit, those vests really are soooo soft <3
kilala.nl tags: creative, kendo,
View or add comments (curr. 2)
2012-01-19 17:58:00
I love putting design on clothes in vinyl or print. I've made festival shirts for us all, anime/japan shirts for my sister and Arrow Emblem clothing for myself. Recently I asked permission from Heeren-sensei, the founder of Renshinjuku kendo dojo, to use the Renshinjuku logo on some sports gear. I am very grateful that he allows me to do so.
The group of people at our Almere dojo has been very welcoming and friendly to newbies. They're very supporting and I'm very proud to have become part of this team! I'd love to have a sweater or jacket with our dojo logo on it, to wear when I'm out running. That way I'll be reminded of my classmates and their support. I'll remember exactly why I'm trying to build more stamina :)
The picture above shows a few mockups I've put together at SpreadShirt.nl. I've always been very pleased with the quality of their work; their vinyl prints are very sharp!
EDIT:
Right, already I'm on the second revision. Dropped the big surname off the shirt and am just using Almere on it. The jacket and sweater will still have a surname on it (so I don't "lose" it), but much smaller on the front. Here is v1.
kilala.nl tags: kendo, creative,
View or add comments (curr. 0)
2012-01-03 07:15:00

As I wrote a few days ago we have been using the year's end downtime at the dojo for maintenance of our equipment.
On the 30th Martijn came to visit, to theorize about our practice dummy and to check his shinai. He also was kind enough to put new lacing in my kote. Both tasks were easily done using the wonderful and free kendo equipment manual PDF. That book has taught me so much! That same evening I put a new belt on the tare and started thinking about sewing a zekken.
Which is exactly what I did! Employing a rather crude split stich I embroidered my name and our dojo's name, as per the standard for zekken. Let me tell you, a thirty-something guy doing embroidery on the train draws some weird looks ;) Now, the result might not be beautiful, but I'm happy nonetheless. And once my 'real' zekken comes in from kendo24 I can still use this one as a small bag to keep my valuables in the dojo.
Finally I put together a simple pillow to put inside the men I borrowed from Loyer-sensei. It's a bit too big for me and the pillow provides enough padding to keep it in place. That's fifteen euros saved right there!
I really enjoy how kendo (a very active and aggressive sport) has lead me to so many calming and relaxing manual activities! I get a lot of fulfilment from knowing that I can properly honor my equipment by providing it with the required maintenance myself. Some people might swing a shinai like a broomstick or muffle their hakama into a gym bag, but to me those things are more than simply tools. And by letting kendo engage my creative side it's become a bigger part of my life.
Now if only I could learn to apply the psychological and mental lessons in real life as well! ;)
kilala.nl tags: creative, kendo,
View or add comments (curr. 3)
2011-06-25 13:24:00
For the past three nights, Martijn and myself have been working on making our shinai carriers. On Wednesday we went to get the materials for the sturdy and waterproof interior. We even got the basic tube finished by then.
Thursday and Friday night were spent on making a cloth exterior, which includes a side pocket for bits and pieces (mostly tsuba and tsubadome). By Thursday at midnight my bag was covered in cloth and only required a bottom piece to finish it off. Yesterday was spent on dressings Martijn's tube and in painting kanji on his bag.
The designs:
Both bags still "require" a covering for the top, but for now I'm happy with the result: two sharp looking and perfectly safe carrying bags for three shinai and a bokken each.
kilala.nl tags: kendo, creative,
View or add comments (curr. 0)
2011-06-22 22:40:00
Inspired by Kristin's lovely naginata carrier project, Martijn and I have started our own spin-off: the rock solid and water tight shinai case (announced earlier this week).
This evening we trotted to the local DIY store to get four meters of PVC tubing (the most economical choice) and all the required trimmings. The full shopping list came in at:
All in all the bill for that comes in somewhere around 15 euros per shinai case and we still have tubing left for a third one. Not bad for starters. For Martijn's case he added a few euros more for the strap and trimmings, while I used the strap and materials from a denim bag of mine that was worn out.
We could've actually kept the costs down a little more by going with either 100mm or 75mm diameter tubing. Our 110mm cases are large enough to fit no less than three shinai and a bokken! o_O Most kendoka carry either 1+1 or 2+1 so our cases are "spacious" to say the least.
For now the cases might not look like much (they really are just PVC tubes with straps), but the next phase of the project will be to find a nice way to dress the cases up a little. I'll probably be going with some strong denim to match the strap, while Martijn was looking for something a bit more out of the ordinary. All in all, there's a nice sewing project coming up!
kilala.nl tags: kendo, creative,
View or add comments (curr. 1)
2011-06-19 10:07:00
Who'd have thought that training a sport would also lead to creative tendencies? You may remember that I kind of, sort of damaged our fence a few months ago, looking for a target to practice men strikes. Since then I haven't found any real alternatives, leading both Martijn and I to search for a frame or a dummy of sorts. A quick search turned up simple practice dummies such as this one and this one. Both look fine and shouldn't be too hard to build.
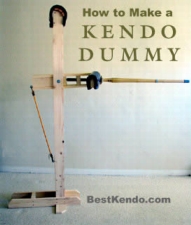
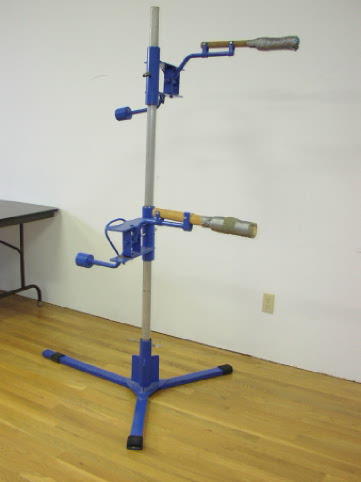
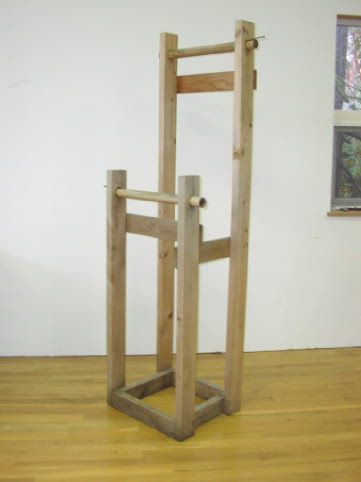
However, instead I would love to build the dummy pictured on the left. It's based on free instructions by Best Kendo, who provide full plans and designs to build this kendo practice dummy. The good part about this dummy: all three valid striking targets (men, kote and do) are available and there's even an option for the dummy to hold a shinai for added realism. It may be a complicated design to put together, but it looks great!
One thing I would like to do differently from the Best Kendo design, is to construct the dummy in such a way that it can be dismantled for storage or transport. This would require a minimal change to the design of the arm (just use a different screw/bolt combo), though the foot would be quite different. Instead of glueing and screwing the body to the base I would use another axle screw/bolt. Because this might compromise the strength of the structure, it might be wise to add a diagonal leg which gets connected with a similar peg.
Another project that I'm looking forward to is making a weather proof case for my shinai and boken. My ideas for the design are inspired by a homemade naginata case project by Kristin. For my shinai case I'll be getting a PVC tube which, like Kristin, I will be covering in a nice looking fabric. Unlike Kristin i won't be attaching the straps to the fabric, but instead I'll use rain pipe fasteners which are usually used to connect a PVC tube to the side of a house.
kilala.nl tags: creative, kendo,
View or add comments (curr. 0)
2011-03-08 22:33:00
After getting my kendo uniform exchanged the fit was a lot better. The size 185 really was way too big for my 179 frame, but oddly even the size 180 was still too big. So out comes my trusty Pfaff! I spent the better part of last night measuring the legs of my hakama to the right length and then hemming them, followed by a re-ironing of the pleats. Now the fit is even better and I got to work with my hands again. And it sure beats paying a seamstress to do it for me!
I also had some time left, so I took the Ikea manga drapes down from my office wall and made a Godzilla tenugui for myself. Handy and good looking! :)
kilala.nl tags: creative, kendo,
View or add comments (curr. 1)
2008-02-05 22:36:00

Here's a little taster of the stuff I'll be using in Thursday's math class. I'll be introducing the kids in a VMBO-BL class to the notion of negative numbers, which can be quite a challenge. I mean, how the heck do you explain to a twelve year old that there's something smaller than zero?
Of course, people will immediately point out things like temperatures, debt and years B.C. Thing is, those are only examples of negative numbers and they don't explain how or why. They just show that it's possible, but a child may not instinctively understand how these figures work.
So, this should prove to be interesting! The picture shown above is part of a stencil I'm putting together for the students. It's part of the first assignment they'll be making, pointing out the height at which various objects reside. I'm very curious about how it'll work out :)
kilala.nl tags: teaching, school, creative, maths,
View or add comments (curr. 2)
All content, with exception of "borrowed" blogpost images, or unless otherwise indicated, is copyright of Tess Sluijter. The character Kilala the cat-demon is copyright of Rumiko Takahashi and used here without permission.