

2015-11-13 23:05:00
I recently was gifted a Yubikey Neo at the Blackhat Europe 2015 conference. I’d heard about Ubico’s nifty little USB device before but never really understood what the fuss was about. I’m no fan of Facebook or GMail, so instead I thought I’d see what Yubikey could do in a Unix environment!
In the next few paragraphs I will explain how I built the following:
At the bottom of this article you will find a video outlining the final parts of the process: registering a new Yubikey and then using it for SSH MFA.
Generally speaking, any system that runs authentication based on Yubikey products, will communicate with the YubiCloud, e.g. the Yubico servers. In a corporate environment this isn’t desirable, which is why Yubico have created an open source, on-premises solution consisting of two parts: ykval and ykksm.
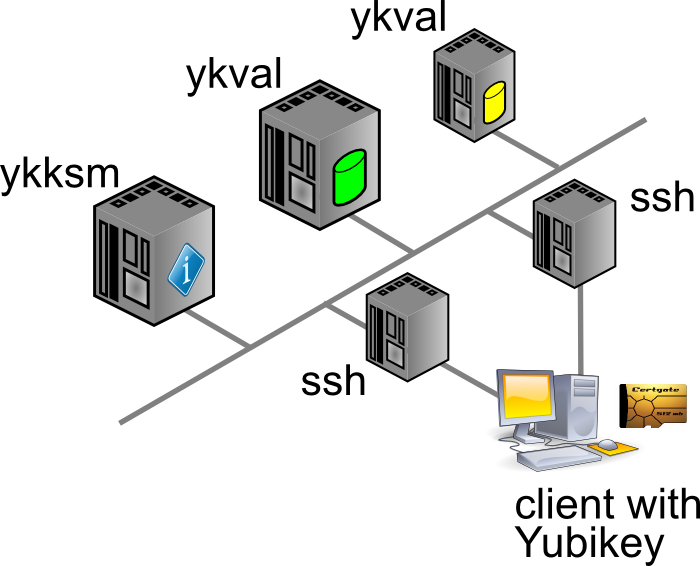
Any product desiring to use YK authentication will contact the ykval server to verify that the card in question is indeed valid and used by the rightful owner. To achieve this, ykval will contact the ykksm server and attempt to perform an encryption handshake to see if the card truly matches the expected signatures.
Yubico provide open source tools and APIs that help you build YK authentication into your software. In the case of SSH (and other Unix tools), all of this can be achieved through PAM. There are many different options of authenticating your SSH sessions using a Yubikey and I’ve opted to go with the easiest: the OTP, one-time-password, method. I’m told that you can also use YK in a challenge/response method with later versions of OpenSSH. It’s also possible to actually use your YK as a substitute for your SSH/PGP keys.
The AES keys stored in YKKSM cannot be the ones associated with your Yubikey product when they leave the factory. Yubico no longer make these keys available to their customers. Thus, in order to run your own local Yubikey infrastructure, you will be generating your own AES keys and storing them on the Yubikey.
My whole project revolves around using CentOS 6.7. Red Hat have made certain choices with regards to upgrading and patching of the software that’s part of RHEL and thus 6.x “only” runs OpenSSH 5.2. This means that a few key features from OpenSSH 6.2 (which are great to use YK as optional MFA) are not yet available. Right now we’re in an all-or-nothing approach :)
If we have SELinux enabled, it has been suggested that the following tweaks will be needed:
On the server(s) you will need to install the following packages through Yum: git-core httpd php mysql-server make php-curl php-pear php-mysql wget help2man mcrypt php-mcrypt epel-release. After making EPEL available, also install “pam_yubico” and “ykclient” through Yum.
On the client(s) you will only need to install both “epel-release” and “pam_yubico” (through EPEL). Installing “ykclient” is optional and can prove useful later on.
On the server(s) you will need to adjust /etc/sysconfig/iptables to open up ports 80 and 443 (https is not included in my current documentation, but is advised).
EPEL has packages available for both the ykval and the ykksm servers. However, I have chosen to install the software through their GIT repository. Pulling a GIT repo on a production server in your corporate environment might prove a challenge, but I’m sure you’ll find a way to get the files in the right place :D
First up, clone the GIT repos for ykval and ykksm:
A few tweaks are now needed:
From this point onwards, you may work your way through the vendor-provided installation guides:
More tweaks are needed once you are finished:
Restart both MySQL and Apache, to make sure all your changes take effect.
We have now reached a point where you may run an initial test to make sure that both ykval and ykksm play nicely. First off, you may register a new client API key, for example:
$ ykval-gen-clients --urandom --notes "Client server 2"
5,b82PeHfKWVWQxYwpEwHHOmNTO6E=
This has registered client number 5 (“id”) with the API key “b82PeHfKWVWQxYwpEwHHOmNTO6E=”. Both of these will be needed in the PAM configuration later on. Of course you may choose to reuse the same ID and API key on all your client systems, but this doesn’t seem advisable. It’s possible to generate new id-key pairs in bulk and I’m sure that imaginative Puppet or Chef administrators will cook up a nice way of dispersing this information to their client systems.
You can run the actual test as follows. You will recognize the client ID (“5”) and the API key from before. The other long string, starting with “vvt…” is the output of my Yubikey. Simply tap it once to insert a new string. The verification error shown below indicates that this OTP has already been used before.
$ ykclient —url "http://127.0.0.1/wsapi/2.0/verify" --apikey b82PeHfKWVWQxYwpEwHHOmNTO6E=
5 vvtblilljglkhjnvnbgbfjhgtfnctvihvjtutnkiiedv --debug
Input:
validation URL: http://127.0.0.1/wsapi/2.0/verify
client id: 5
token: vvtblilljglkhjnvnbgbfjhgtfnctvihvjtutnkiiedv
api key: b82PeHfKWVWQxYwpEwHHOmNTO6E=
Verification output (2): Yubikey OTP was replayed (REPLAYED_OTP)
For the time being you will NOT get a successful verification, as no Yubikeys have been registered yet.
At the bottom of this article you will find a video outlining the final parts of the process: registering a new Yubikey and then using it for SSH MFA.
As I mentioned before, you cannot retrieve the AES key for your Yubikey to include in the local KSM. Instead, you will be generating new keys to be used by your end-users. There’s two ways to go about this:
In either case you will need to so-called Yubikey Personalization Tools, available for all major platforms. Using this tool you will either input or generate and then store the new key onto your Yubikey.
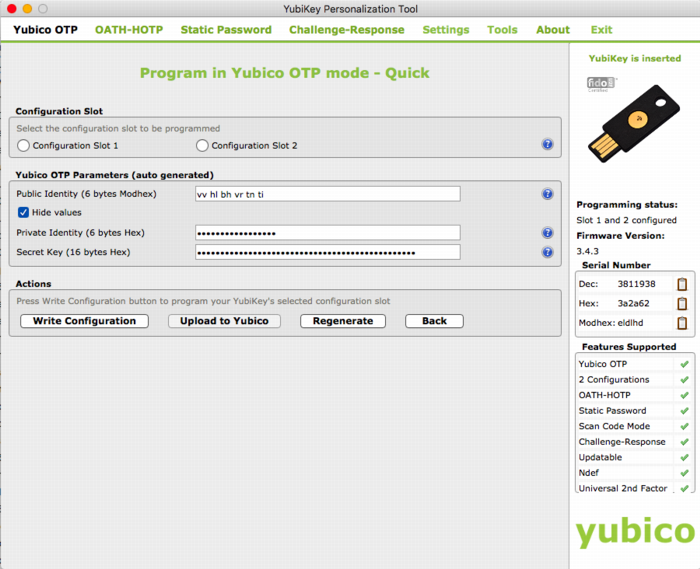
The good thing about the newer Yubico hardware products is that they have more than one “configuration slot”. By default, the factory will only fill slot 1 with the keys already registered in YubiCloud. This leaves slot 2 open for your own use. Of course, slot 1 can also be reused for your own AES key if you so desire.
It’s mostly a matter of user friendliness:
In my case I’ve generated the new key through the Personalization Tool and then inserted it into the ykksm database in the quickest and dirtiest method: through MySQL.
$ mysql
USE ykksm;
INSERT INTO yubikeys VALUES (3811938, “vvtblilljglk”, “”, "783c8d1f1bb5",
"ca21772e39dbecbc2e103fb7a41ee50f", "00000000", "", 1, 1);
COMMIT;
The fields used above are as follows: `serialnr`, `publicname`, `created`, `internalname`, `aeskey`, `lockcode`, `creator`, `active`, `hardware`. The bold fields were pulled from the Personalization Tool, while the other fields were left default or filled with dummy data. (Yes, don’t worry, all of this is NOT my actual security info)
Now that both ykval and ykksm are working and now that we’ve registered a key, let’s see if it works! I’ve run the following commands, all of which indicate that my key does in fact work. As before, the OTP was generated by pressing the YK’s sensor.
$ wget -q -O - ‘http://localhost/wsapi/decrypt?otp=vvtblilljglkkgccvhnrvtvghjvrtdnlbrugrrihhuje'
OK counter=0001 low=75e6 high=fa use=03
$ ykclient —url “http://127.0.0.1/wsapi/2.0/verify" --apikey 6YphetClMU1mKme5FrblQWrFt8c=
4 vvtblilljglktnvgevbtttevrvnutfejetvdvhrueegc --debug
Input:
validation URL: http://127.0.0.1/wsapi/2.0/verify
client id: 4
token: vvtblilljglktnvgevbtttevrvnutfejetvdvhrueegc
api key: 6YphetClMU1mKme5FrblQWrFt8c=
Verification output (0): Success
As I’ve mentioned before, for now I’m opting to use the Yubikey device in a very simple manner: as a second authenticator factor (MFA) for my SSH logins. We will setup PAM and OpenSSH in such a way that any SSH login will first prompt for a Yubikey OTP, after which it will ask for the actual user’s password.
Create /etc/yubikey. This file maps usernames to Yubikey public names, using the following format:
thomas:vvtblilljglk # :
The great news is that Michal Ludvig has proven that you may also store this information inside LDAP, which means one less file to manage on all your client systems!
Edit /etc/pam.d/sshd and change the AUTH section to include the Yubico PAM module, as follows. Substitute for the fully qualified hostname assigned to the ykval web server.
auth required pam_sepermit.so
auth required pam_yubico.so mode=client authfile=/etc/yubikey id=5 key=b82PeHfKWVWQxYwpEwHHOmNTO6E= url=http:///wsapi/2.0/verify?id=%d&otp=%s
auth include password-auth
Finally edit /etc/ssh/sshd_config and change the following values:
PasswordAuthentication no
ChallengeResponseAuthentication yes
Restart the SSHD and you should be golden!
When it comes to either ykksm or ykval full logging is available through Apache. If you’ve opted to use the default log locations as outlined in the respective installation guides, then you will find the following files:
[root@master apache]# ls -al /var/log/apache
-rw-r--r-- 1 root root 15479 Nov 13 21:53 ykval-access.log
-rw-r--r-- 1 root root 36567 Nov 13 21:53 ykval-error.log
These will contain most of the useful messages, should either VAL or KSM misbehave.
Aside from all the pages I’ve linked to so far, a few other sites stand out as having been tremendously helpful in my quest to get all of this working correctly. Many thanks go out to:
kilala.nl tags: sysadmin, work, security,
View or add comments (curr. 2)
 You are free to use this specific work, to share and distribute it and to adapt it for your own purposes. However, you must attribute this work as mine and you must share all of your alterations. Click on the logo, or follow this link for full details.
Posted by Jen Mead
Hi Thomas,
Your guide on how to get OTP self hosted Yubico technology really helped me out. I had a question though. As I add more folks to the /etc/pam.d/sshd file it seems to want to ask for the yubikey OTP once for each new user. I am sure it is not supposed to act like that and will make the key unusable when I roll it out in Production. Your example had one user inserted, so my question is did you get more than one user to work? If so how? Documentation on Yubikeys is all over the place and most of it useless, I am on Centos 7.
Thanks
Posted by Tess
Hi Jen,
I'm not quite sure I follow, because you do not add people's accounts to /etc/pam.d/sshd. You only add a hook to the Yubikey plugin in there.
Now, when it comes to registering new users, it makes sense that the Yubikey software wants you to submit the OTP at least once. This is done, in order to sync up the mathematics in the key with the maths in the server. RSA tokens and Google Authenticator need the same thing.
I'll drop you an email, so we can chat a bit faster than through here. Afterwards I'll add a comment detailing the outcome.
All content, with exception of "borrowed" blogpost images, or unless otherwise indicated, is copyright of Tess Sluijter. The character Kilala the cat-demon is copyright of Rumiko Takahashi and used here without permission.